|
Ready, Set, Plant!
|
|
Soil Preparation
Now that you have a plan, you need to get your soil ready. While you could plant one bulb at a time using a bulb trowel, you could get extra moisture into the hole which could mold your bulb if you haven't already loosened and worked your soil…so you are better off digging out a trench or larger area for your bulbs. If you are planting in potting soil or other bagged soil mixture, be sure to add more sand and other things to "fluff it up." Many potting soils are made to retain moisture and can result in rotten bulbs. This is especially important if planting bulbs in containers or planters.
The general rule for planting depth is 3-4 times the height of the bulb.
For tulips and daffodils, you'll need to really dig…a good 6-8 inches (and some publications recommend 8-10 inches), with the next 4 inches below that being loosened. Depending on how good the soil is, plan on adding an additional 25 - 50% of soil volume as sand, peat moss, compost, leaf mold or other organic matter to encourage drainage and aeration.
If you are only planting the little guys, digging about 4-5 inches, and then loosening the soil below that, should be sufficient. Follow the above suggestions for improving your soil.
It's a good idea to use a ruler - it's easy to misjudge and turn out too shallow or too deep. •
|
|
Feeding Your Bulbs
Include bulb booster mixed with the soil at the bottom of the trench and dig it in below where the bulbs will lay. This fertilizer should last for several seasons.
When adding fertilizer, mix into the soil below the depth where your bulbs will go and then add a couple inches of soil to make the depth for the planting. This helps prevent bulbs from getting burned by the fertilizer. One publication even suggests that while applying fertilizer into the ground is a very common practice, that a top dressing of fertilizer is their recommended approach. Bottom line: just fertilize and do it carefully!
- Use 2 cups for each 5'x10' (50 square foot) area. Sprinkle granules evenly and mix into the soil 4-6 inches deep. A little will go a long way.
- If planting one bulb at a time, mix 1 teaspoon in the bottom of the hole, drop in a handful of soil and then place the bulb in the hole. Do not let the bulb directly touch the plant food.
- Nitrogen is also needed and is best given to established bulbs in the fall using a bulb booster by applying it one to two inches into the ground. During the spring, high-nitrogen fertilizer is a good idea and can be applied by using Urea &endash; one pound per 100 square feet and stirring it into the ground after removing any plant litter.
- Tulips like a slightly acidic soil and if you are serious about your tulips, you might want to get a soil test kit and use additives according to your soil needs. Daffodils, on the other hand, are happy with one application of fertilizer and then can scavenge for future food supplies. •
|
General Planting Hints
Plant with the "pointy" side UP (or the flattest side DOWN) and give the bulbs a gentle half twist as you place them in the soil to help them stay upright as you cover them with soil.
Water after planting only if the soil is dried out and rain is not expected (could we hope for such a problem?) You'll want to cover the bulbs with about 4 inches of soil (or a couple inches if planting the little guys) and water, if needed, before adding the rest of the soil.
After the ground freezes, add 2-4 inches of mulching material over the beds to protect the bulbs from frost heaving. Waiting until the ground is frozen helps excess moisture from being trapped. Mulching helps prevent frost heaving. Mulch can include pine needles, fur boughs, peat moss, wood chips, etc. Use leaves only if they do not seal out air and water. The mulch should be removed when signs of spring growth are visible…so watch for it!
When shoveling snow, toss a snow blanket over your bulbs to keep them cozy. •
|
PLANTING CHART
From the Quick Reference Chart to Hardy Bulbs in The Garden Book
All plants in our selection grow in full sun (*) or partial shade.
|
Plant
|
Height
|
Bloom time
|
Depth
|
Spacing
|
|
Allium moly
|
10-15
|
5-6
|
4
|
3
|
|
Allium neapolitanum
|
10
|
5-6
|
3
|
3
|
|
Allium ostrowskianum
|
10
|
5
|
5
|
3
|
|
Chionodoxa
|
5-8
|
3-5
|
3
|
3
|
|
Crocus, Hybrid
|
5
|
4
|
4
|
4
|
|
Crocus, Autumn
|
5
|
9-10
|
4
|
4
|
|
Fritillaria meleagris
|
9-12
|
4-5
|
3
|
4
|
|
Hyacinth
|
8-12
|
4-5
|
6
|
6
|
|
Iris - Dwarf
|
4-6
|
4
|
6-8
|
2-4
|
|
Leucojum Aestivum
|
14
|
5
|
5
|
4
|
|
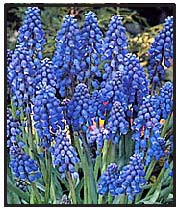
Muscari
|
4-7
|
4-5
|
3
|
3
|
|
Ornithogalum umbellatum
|
8-12
|
5
|
4
|
4-6
|
|
Scilla Campanulata
|
10-15
|
5
|
5
|
4
|
|
Greigii Tulips
|
6-14
|
5
|
6
|
6
|
|
Single Late Tulips
|
22
|
5
|
6-7
|
4-6
|
|
Triumph Tulips
|
14-28
|
5
|
6
|
6
|
|
Trumpet Daffodils
|
5-20
|
4-5
|
4-7
|
4-12
|
Bloom time refers to bloom time for the coldest zone where hardy, so 4-5 = April-May. This at least gives a relative way of looking at bloom times between selections.
Depth refers to the soil level to the top of the bulb, in inches…so dig deeper!
Spacing refers to the distance between plants in a group.
Note: The Southeast Gardening Book suggests planting daffodils 9-10 inches deep and Carolyn Jensen plants hers 12 inches deep (and raises lively discussion by noting this!). •
|
|
Rotary is a worldwide organization of business and professional leaders that provides humanitarian service, encourages high ethical standards in all vocations, and helps build goodwill and peace in the world.
In order to fund some of these activities, the Juneau Gastineau Rotary Club invites friends and neighbors throughout Juneau to purchase some of the beautiful bulbs that we offer each year. Bulbs are hand selected by a team of Rotarians, including a few Master Gardeners, who are experienced and know what works well in our climate.
|
|
Not only are they a beautiful addition to any garden or yard, but the proceeds go towards funding projects right here in Juneau.
Traditionally, we start taking orders in July, wrap up sales in late fall, have bulbs ready for planting in October.
We are looking to provide Juneau with more bulbs than ever before. With the purchase of Rotary Bulbs, your gardens help fund many of the Community Service Projects, Scholarships, and other activities that benefit Juneau.
|
|
Planting the Little Guys
Planting in the Lawn Many small bulbs (particularly the crocus in this year's selection) are happy to live in your lawn. The concept is that they flower when the lawn is still brown, giving you a delightful spurt of color. When the leaves die out, it's time to mown your lawn for the first time. You can plant in waves of single colors, mix the colors and species together, or create a more formal design by sprinkling flour to outline a design (symbol or word) and then planting one kind of bulb so that the bloom occurs at once. Some ideas can be adapted for existing lawns, others are best done at the time a lawn is planted
For existing lawns: Take your shovel and dig down about 4-5 inches. Sprinkle a teaspoon or so of bulb booster into the sod, and add a bit of soil or peat moss so that the bulbs aren't right on the fertilizer, drop your bulbs, about 2-3 inches apart, close the wedge made by the shovel…and go on to the next spot. You can make designs, or go for a more scattered look, but remember that the more you plant fairly close together, the more vivid the color spot.•
|
Planting in Patches
For crocuses, either plant by color or mix them up…the effect will be interesting however you play it, though planting by color, particularly for the hybrids is recommended. Plant the bulbs about 4 inches apart. You may want to blend one variety into another, like the paintbrush scheme discussed earlier, possibly mixing the snow and hybrid varieties for an expanded color show.
Grape Hyacinth will take over an area and create a great purple/blue carpet. Plant 3 inches deep and 3 inches apart. Scilla Campanulata can also multiply rapidly…so save some room!
Whatever you do, plant the little guys in masses to make a good showing.
Dutch Iris: Plant in well-drained, acidic soil and in full sun. Plant about 5" apart and 4-5" deep. They require winter protection. After the ground first freezes, apply a light mulch of straw, moss, or evergreen boughs. I know &endash; they get taller, so why the "little guy" designation &endash; well, the bulbs ARE pretty small! •
|
|
Planting the Big Guys
Tulips are planted 6-8 inches deep and about 4-6 inches apart. The double late tulips should have a little bit more room, since their blooms are wider. The depth can be on the six inch side when planting closer to a building. If you are trying to encourage your tulips to return for several years, plant 8-10 inches deep. Daffodils are often planted a little deeper than the tulips, planting also about 4-6 inches apart. Our selection of tulips will probably bloom later than the daffodils, to extend the spring bulb season of color.
To mark your daffodil and tulip beds, use Grape Hyacinth around the parameter. The fall foliage will show you the existing bed and tell you where to enlarge your bed or fertilize. Include Grape Hyacinth in a layer above your daffodils for a nice color combination. •
Planting a Bulb Stew
As discussed earlier, you can plant bulbs in layers. Using your daffodils or tulips (or both with daffodils planted under the tulips), space them about 6-8 inches apart and then add soil until your soil depth is right for the smaller bulbs and plant those 2-3 inches apart. You may want to plant daffodils with muscari and you may even want a top layer of crocuses. Dwarf irises can also be included in this mix.
|
Planting the Really Big Guys
Bearded Iris
Bearded irises will grow to about 35" and require a different approach. These are rhizomes, not bulbs.
Plant in reasonably good moist soil, with good drainage and full sun. They need alkaline soil, so you may need to add some lime or ash. Plant toward the back of beds. These are not bulbs, but are rhizomes.
Prepare the soil using bulb fertilizer or bone meal. Add sand, peat moss, or other supplements given your drainage and conditions. Add lime or ash if soil is acidic.
Scoop out a space large enough to cover the rhizome with 1 " of soil, making a slightly raised mound in the center.
Place the rhizome on the mound with roots spread on either side, out and down. Cover and firm the soil over the rhizome. Water thoroughly.
After the ground first freezes, apply a light mulch of straw, moss, or evergreen boughs.
For cut flowers: Cut bearded iris as the first bud is opening and let it open fully inside the house.
Oriental Lilies These grow 3' - 5' tall, so plan on staking them. They are great in the back of beds and along fences or trellises. They want morning sun, shelter from the wind, good air circulation, and good drainage. Plant them about 8" deep and about 12" apart, in groups of three or more. When preparing the soil, add some sand and also place a cup of sand under each bulb. Work either bone meal or 10-10-5 fertilizer into the soil around the bulbs. Stake and label the area you planted so you don't accidentally step on them before you see them. •
|
|
Planting a Container Garden
|
|
See the section on preparing your soil. Plant bulbs so that they almost touch each other. If you want, tulips and daffodil bulbs can be planted so that their points face to the center of the pot with the soil just covering the bulbs. Otherwise, larger bulbs should have their tips about level with the soil, with the soil about one inch lower than the rim of the pot. Smaller bulbs should be planted a bit deeper, with tips just below the soil.After soil is placed around the bulbs, water thoroughly.
Bury pots in a foot deep trench and cover with 6-8 inches of wood chips, sawdust, peat, sand, or dirt.
|
Or place them in a cold frame and also bury pots the same way. Occasionally look for signs of growth, shoots breaking through the potting soil or roots emerging from the bottom of the pot. Then remove the pots and move to a shady spot until the shoots turn from white/pale green to a more normal green. They can then be moved to their intended location, including in direct sunlight. Water and fertilize until after foliage has turned yellow and then remove the bulbs from the pots.
You can either dry them out by laying them on planting trays or plant them immediately in your garden.
|
The next year's bloom will not be as strong, but should return to normal the following year. Any of the bulbs we are offering should do well in containers.
We also know that some of us have success simply planting bulbs in large pots and planters, without burying them. Make sure bulbs are at least a couple inches from the outer edges of the pots and just hope your bulbs don't freeze. You might want to move your pots to more protected areas - like under covered porches. •
|
|